Homemade Chicken Bouillon!
- Lisa L.
- Jun 15, 2022
- 3 min read
Yes!! You can make your own bouillon! Who knew?! There's a reason why I have this recipe in the "Preps" category. There are a lot of people preparing to "bug out" during SHTF. This would be something portable, easy to prepare on the go and delicious. I've known how to make bouillon for several years now, but just recently I looked up the history of bouillon. I had no idea it goes all the way back to the mid 1700's. Here's a quote from the article I read...
"In the late 18th century, Count Rumford (1753-1814) an American born physicist during his service to the Elector of Bavaria, he invented and mass-produced a fully nutritious, solidified stock of bones, inexpensive meat by products and other ingredients. He fed the Duke’s army with it. His invention was the precursor of the bouillon cube".
It's a very interesting article. Here's the link: History of Chicken Bouillon Another name for it is "Pocket Soup". Cool, huh?
I find it informative. Oh? You wanna make some? OK! Let's do this!
It's really easy, just time consuming. Patience is a virtue.
I'm going to assume that most of you know how to make chicken broth, right? No? Well, here's a simple recipe for that: Chicken Broth 🐔 If you don't want to use all the ingredients listed in the link, Just use the bones, veggies, water and salt. It will still come out great!
Now the bouillon!
Once you have your broth made, let it cool to room temperature and put it in the fridge overnight. When you take it out of the fridge, skim the solidified fat off the top (use the fat to flavor beans or make a scrumptious gravy).
Over medium heat, simmer your broth until it's reduced at least by half. It should resemble a thick gravy. This will take some time and attention. Stir occasionally. Do not leave it.
When you get the gravy consistency, remove frome the heat and let it cool to room temperature.
Pour it onto fruit leather trays for your dehydrator. Don't pour it too thick. Yes, this will take a lot of time to dry, but if you pour it too thick it will take even more time. We want to avoid that. Set your dehydrator for 140° to 145° F. Let it process overnight.
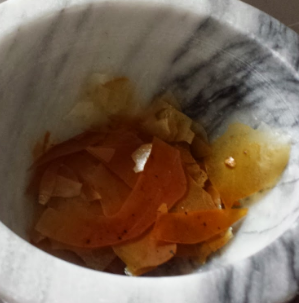
In the morning, check for soft spots. Using the back of a spoon, spread the soft spots over the already dry spots and put back in the dehydrator. Check it again in the afternoon. Repeat this process until it's all completely dry. It should break like a potato chip. Keep in mind that once it starts to dry, it'll be sticky. You'll need some kind of scraping tool to get it off the tray. When you do that, flip it over and continue dehydrating. It MUST ALL be completely dried and crisp! No moisture whatsoever! If you're in doubt after you've broken it into pieces, put the pieces (all of them) back on a clean fruit leather tray and let it go overnight again. Or for the thicker pieces, break them at the soft spot and continue dehydrating. Better safe than sorry!
Break it all up into small pieces and put them in a jar with an oxygen absorber. Here is a local place to by O2 absorbers. The Preparedness Depot Tell 'em Lisa Lummus sent you! Ask for Wes. Great and knowledgeable guy!
This is a long process, but once you taste it, you'll know without a shadow of a doubt that it is soooooo worth the time!
This can be done with beef, pork or just vegetables too! It's a great homemade soup base to have on hand without additives and foreign ingredients you can't pronounce 😜! Take it on a hike or a picnic with some dehydrated vegetables and throw in some shredded chicken and you've got yourself an awesome soup!
It's also very potent. A lil' dab'le do ya!
Here's what the finished product looks like:

Thank you for stopping by!


Comments